Neil Matthews

Category: How To

  • [INFOGRAPHIC] Troubleshooting WordPress The WPDude Way

    [INFOGRAPHIC] Troubleshooting WordPress The WPDude Way

    I’ve created a new downloadable infographic that shows you how to trouble shoot a WordPress site the WP Dude way,  if it crashes.

    You may not need this information right now, but it’s better to be prepared and have the knowledge to hand should your site crash.

    Imagine the scene, you are in panic mode, your site is not working and you are losing business.  Now imagine an alternative where you have a step by step guide to calmly troubleshoot your website to get it back online.

    Course

    The infographic give you the steps to troubleshoot a WordPress crash but I have also created a 6 step email course on how to do each of those steps.  Keep the info graphic and the email course in your archive for a rainy WordPress crashy day.

    Download The Infographic & Get The Course

    [gravityform id=”122″ title=”false” description=”false”]

    Photo Credit: Nicholas Erwin Flickr via Compfight cc

  • Uptime Monitoring For WordPress

    Uptime Monitoring For WordPress

    Let’s face it you are not monitoring your WordPress site 24/7 for uptime, you are running a business and having a life.

    Today I want to talk about some automated uptime monitoring tools for your site which will alert you if it goes down.

    Downtime Is Not A Good Time

    Having a potential customer / client visit your site only to find error messages or the site completely offline is not good, your reputation could be ruined and you could lose new business or repeat orders.

    Being the first to know your site is down is pretty important, so I’ll tell you some good tools to use.

    Don’t remind me of the day I was running Facebook ads and the site was crashing, It would have felt better to set fire to a pile of cash. I know from first hand experience what downtime without alerts is like.

    Two Types Of Monitoring

    There are two main types of uptime monitoring available, we need both in place for a good monitoring solution.

    Ping monitoring – this is where a tool connects to your website and checks for a valid return code. “Oh no he’s bibbling in techie again !”I can hear you say.  Each time your browser connects to a website it also returns a code to the browser along with the content.  Everthing below 400 means every thing is okay, 404 means the page is missing, 500 mean an error there are a whole long raft of these return codes, uptime monitors check for and alert if an error code is returned.

    Content Monitoring – sometimes websites return error codes, but they also return site okay codes so we need to do a double team of a ping with a content monitor.  This tells your uptime monitor to look for specific content in the page.  Let me give you an example, half way down my home page is the following string, if my monitor cannot detect that, then there is definitely a problem with my home page and an alert should be raised.

    Let me do the WordPress technical support
    while you get on with building your business

    Multiple Page Monitoring

    I tend to focus on the home page of sites for monitoring but if you have a high value e-commerce store you should  also consider monitoring the cart page and the checkout page too, the home page could be up but internal pages could be down.

    Alerting

    Most of the tools send email alerts, but some also alert to slack or even SMS, you can decide how critical uptime is.

    Repeat Checks

    It is important that the tool you choose keeps checking and alerts you if your site comes back online, it is not unknown for a host to crash and be back up in a few minutes.  Guess what they won’t tell you there has been an outage (Godaddy I’m looking at you here).

    Uptime Monitoring Tools

    All uptime monitoring needs to be external to your site, it will send pings and content monitor pulls from an external server as if a client was connecting to your site.

    Here are the tools I recommend:

    Jetpack

    The multipurpose plugin created by the team at Automattic.  One of the features is a monitor.

    You will need an account at WordPress.com for this system to work.  Jetpack is a ping only monitor, there is no content monitoring, read this for more details on how they monitor https://jetpack.com/support/monitor/

    Cost – free

    URL – https://en-gb.wordpress.org/plugins/jetpack/

    Uptime Robot

    This is an external system where you setup one or more sites or multiple pages within one site, I used this for many years.

    It has pings and content monitoring, the pro version has SMS alerts.  There are some advanced monitors such as ports and http specific monitors.

    There is a plugin for WordPress where you can pull in uptime stats into your WordPress dashboard.

    Cost – the first 50 monitors are free then you pay for pro versions at about $5 per 50 monitors.  A monitor is a single check, so on one site ping would be 1, a content check would be another.

    URL – uptimerobot.com

    ManageWP

    My preferred uptime monitor for my own and maintenance client sites.

    Managewp uptime monitor checks for http codes and for custom strings on a page, it sends alerts via email, SMS or slack if that is your thang.

    Cost – managewp is free but the uptime monitor is an addon at approx $1.50 per month (managewp billing is super complex).

    URL – managewp.com

    Wrap Up

    I recommend an uptime monitor even the free ones above are really good and the 5 minutes it takes to activate can help your online reputation.

    Photo Credit: MaartenB Flickr via Compfight cc

  • How To Add A Facebook Page Plugin To WordPress

    How To Add A Facebook Page Plugin To WordPress

    The Facebook page plugin (or like box as it used to be called) is a way to showbcase your Facebook page on your website away from Facebook itself.

    In today’s video tutorial I am going to show you how to add the plugin into your site. The facebook page plugin is some code that needs to be ibntegrated and not a plugin int he WordPress sense.

    The page you need to visit to grab your code is:

    https://developers.facebook.com/docs/plugins/page-plugin

    If you need help implementing a Facebook page plugin, get a no obligation quote.

    Photo Credit: Jonathan Rolande Flickr via Compfight cc

  • How to choose the best template for your website and not to be overwhelmed.

    How to choose the best template for your website and not to be overwhelmed.

    This is a guest post by Anastasia Pirog from TemplateMonster.  TemplateMonster is a premium theme / template marketplace where you can buy an new look and feel for your website, take it away Anastasia where shel tells us How to choose the best template for your website – Neil

    How to choose the best template for your website and not to be overwhelmed.

    Building a website is quite a hard task. And even if you decided to choose a ready solution and pick up a nice template it can be not as easy as you might think. A huge variety of marketplaces and the themes they offer can be quite overwhelming for the newcomers as well as for the professional developers. So what should you do to pick a worthy template? Here you can find a little tutorial on how to find the winning template. So let’s have a look:

    Step 1 – The CMS

    So the first thing you face when visiting the template marketplace is the variety of themes and platforms they are based on. The basic thing you have to decide on while building a website is what CMS you need. If you are if you’re an experienced developer or just know what you already need, you can miss this step. I won’t write a lot here. The thing you need to understand is that everything depends on your requirements. There’s no right or best CMS, each has its own advantages. I’ll just say that if you are a beginner, and that’s why you are probably reading this paragraph, or you just want a convenient and easy in use website that will let you set your resource on your own – WordPress is for you. It’s convenient and with it, you can build a website that will suit different requirements from personal to huge corporate resources.

    Step 2 – Free or Premium

    The other crucial question that bothers the minds of lots of people is whether they should choose a free or premium template for their resource. Today, there are a lot of marketplaces that sell premium themes like TemplateMonster or share the freebies like WordPress.org. The advice that I’m giving is straightforward. Once again I’ll say that everything depends on what you need. If it’s your first website or you just want to create a website where you will share the stuff you like with your friends or like-minded people, than a free template will be just the thing to feel the water of website building. Though if you want to create something professional and serious or to have earnings from it, you should invest money in your website, so a premium template is just the thing. The premium themes often have better design and quality. I’m not telling that free themes are worse. But chances that you’ll spend more effort and energy while searching for a great free template are higher compared to searching for the paid resource. Here’s when the rule of “no money, no honey” works.

    Step 3 – Working with the marketplace

    So you know what CMS you need, decided on your budget and design. You go to the marketplace, you see all those templates. And you get confused. Seems familiar? I think so! It’s a situation almost everyone faces.

    So what should you do? Just think of the website you want and choose something.

    • Use the search for your template


    Each of the marketplaces has a convenient form of the search. If you know exactly what you want from your website, just type the name of the needed feature or product type in the search form or find the categories menu and choose the one that suits your needs. If not, just start with such things as the kind of your website.

    • Stick to your sphere


    Today web designers and developers create templates for certain spheres. What is good about each template, is that by adding your content and changing the images you can create something completely different. What is good about the thematical template, is that someone has already thought about how the website should look like. The visual language and structure of a corporate website are different from the personal website, one needs more texts, the other one – more images. So if someone has already created a layout that you need – why not to get a profit out of it? It’s when you have to go back to the previous statement. Use the search.

    • Think of the needs of your stuff and your clients.


    While building a website and choosing a template think what are the best things for presenting your content. And what is more important, think about your clients. If you are in their place and visit a website like yours, what do you want to see there? If it’s a news website – choose a template with convenient archive structure and search, for an online store – choose a template with convenient navigation, notable call-to-action buttons, image content for presenting your products in the best way, this list can be continued.

    • The design


    The design of templates is versatile. And of course, each man to his taste. But you surely need to consider certain things. Of course, choose the template that you like most of all.  The great thing about the template is that a lot of marketplaces let you use stock photos in the package. So if you don’t have to impress your website users with your own images, you can easily leave the template the way you choose it. From the things you should pay attention to, the next are the ways to customize the design. Look how the structure can change, what you can do with the footer and header, how you can change your content, how the size of images can change, if there are any fonts and variants of texts. Pay a lot of attention to the color schemes. It’s great if the template has a color switcher, and you can easily change your website. If not, look at the color the designer used for the template. Here everything depends on your needs, choose subtle colors for official websites, and more vivid colors for websites that will serve for another purpose.

    • Usability


    This is one of the needed technical characteristics you have to bear in mind while choosing your website design. The template should be easy for you to set it, so that later your website would be convenient for your clients to navigate through. That’s why look at the customizer first. And make sure that you understand how to use and set your template. Look through all the pages of the template, and choose the one which doesn’t require you to think long where to click to get there or how you can find that information.

    Look at the features that are listed in the template. And choose the template that will suit your needs. Look at the framework that developer used for the template, and consider what you need. If you want to focus on the presentation of the media content, look at the features like video or audio integration, if you want to build an international website, look at the translation feature.

    The features that will suit any website are:  responsive design and cross-browser compatibility. These features will ensure that your website will scale to fit any screen of any device and work in all of the browsers. The useful thing is that marketplaces allow searching a template by the links to one or several specific features, so if you think that your website will need a certain option, just click on it, and you will get the list of template from which you can choose.

    Some marketplaces offer you a trial period. Look, if your template provides this kind of service. Does it have such a period? Give it a try, then!

    • Listen what people say


    The marketplaces have useful things such as clients’ testimonials and ratings. If you still don’t know where to start, try to look at the bestsellers or templates with the highest ratings. If you choose several templates or know what you want, look at the testimonials or reviews of the people who have used these items already. There you can find some useful information about how this template really works, if there are any bugs or if it’s worth buying at all.  

    Step 4 – Enjoy your website!

    It not so easy to choose a template, but you can do it. Decide on what you want from your website. Don’t be confused by the variety of themes, look for certain things, choose the template that will suit all your needs, customize it with ease, and get your astonishing website going. Enjoy!
    It’s very easy to get overwhelmed with a wide range of themes in the marketplaces. Each day there are new items appearing. Things you are looking for have to be are the best design and features for your website. The thing that wasn’t said here is the price. I won’t tell you about the price. This is what you should decide for yourself. Obviously, if you have a big budget, it’s better to spend some money on your website. The key rule is to know what you want for your online resource. You should keep calm, and choose the template that will suit all your needs. And all will work!

    If you need help with your WordPress site get a no obligation quote.

    Photo Credit: A Train via Compfight cc

  • Creating Blog Posts Using Gravity Forms

    Creating Blog Posts Using Gravity Forms

    One of the really useful features of gravity forms is the ability to create content in WordPress from a form on the front end of your site.

    I’ve created a video tutorial to show you how to create a form that will collect data and create a blog post.

    Why Would You Want To Create Content With A Form

    The simple answer is user generated content.  This allows you to collect data from site visitors without giving them login access to your website.

    Examples

    Here are some examples of collecting user generated content:

    News site – one of my clients runs a local news site for a small town.  She has a form on her site which allows local residents to submit stories, they are saved as draft, to run through an editorial process.

    Mountain Climbing site – this client allows climbers to submit routes, they are assigned to categories such as state, difficulty.  He allows images to be uploaded, this content is then submitted to a database of climbs throughout the US.

    Testimonials – I use this technique on wpdude.com to collect client testimonials.  The client submits a form with hopefully glowing praise at wpdude.com/add-testimonial it is added to the testimonial custom posts types as a draft, I then review and publish the testimonial.

    Video

    Wrap Up – Creating Blog Posts Using Gravity Forms

    If you ever need users generated content and don’t want to give site visitors a login consider using gravity forms.

    Photo Credit: Sarah G… via Compfight cc

  • 8 Hints & Tips To Spice Up Your Nav Menu

    8 Hints & Tips To Spice Up Your Nav Menu

    Do your nav menus need a little love?  Are you worried people are not navigating your site well, here are 8 hints and tips to make your menus look better.

    1. Responsive Menus

    Don’t treat your menus on mobile devices the same way you would on a desktop device.

    Real estate is at a premium on a smaller screen so if you have a long meandering menu it will wrap and look poor on a mobile device.

    The plugin responsive menu https://wordpress.org/plugins/responsive-menu/ allows you to show a small unobtrusive menu icon on mobile device rather than a full menu.

    2. Icons In Your Menu

    Add a little flair to your site with some Font Awesome icons to highlight what each menu item does.

    With Fontawesome 4 Menus plugin https://wordpress.org/plugins/font-awesome-4-menus/ you can add a little icon at the start of each

    3. Jazz It With Custom CSS

    You can add a custom class to each menu item in WordPress.  Once you have added the custom css you can style the menu item as you wish.

    nav menu

    On WPDude I style my main call to action for WordPress technical support by making it red.  I’ve styled clients menu items to look like buttons, the list goes on.

    4. Split Testing

    Do you know what copy really works with your menus?  With a little bit of split testing you can be sure what works.

    Nelioabtesing offers WordPress A/B split testing, one of their tools allows you to split test menu items and see which option converts best.

    It’s not cheap, being the bootstrapper I am I would probably code up a solution using Google split testing.

    5. Images in Menus

    One of my clients sells industrial welding tools, they have a wide array of kit and use images in their navigations to highlight what they are selling or hiring.

    They do this with the Menu Images  plugin https://wordpress.org/plugins/menu-image/

    This plugin adds a neat little upload option to add images to your menus.

    6. Conditional Menus

    How about offering menu items based upon what a site visitors condition is.  Logged in logged out, mobile device etc etc. you can do that with a plugin called If Menu https://en-gb.wordpress.org/plugins/if-menu/

    I wrote a complete post about IF menu so I’ll not dig too deep, Plugin Review: If Menu.

    7. Export Menus

    Not really a jazz up tool but a very useful tool if you are moving large menus between sites, this plugin allows you to export your menu structure as an XML file then import it at your destination site. https://wordpress.org/support/view/plugin-reviews/menu-exporter

    If you have ever had to build large menus you will know what a tedious pain that is.

    8. Circular Nav

    I’m running out of ideas at the end of this post, but these effects are just coooool!

    https://en-gb.wordpress.org/plugins/fixed-circular-navigation-menu/

    Wrap Up – Spice Up Your Nav Menu

    Give your menus  a little TLC this weekend to keep your site visitors navigating with ease.

    Photo Credit: tesal22 via Compfight cc

  • [VIDEO] Fixing Google Page Speed Insights Issues

    [VIDEO] Fixing Google Page Speed Insights Issues

    If you visit Google page speed insights, you will be shown a page speed load score and a series of solutions to make your site load more quickly.

    This video tutorial will show you how to fix the common issues returned.

    Why Speed Up Your Site?

    Google has stated that page load time is one of the metrics it uses to rank your site.  Their studies have shown that people abandon slow sites more often than quickly loading sites.

    It is a good idea to keep your site visitors and Google happy by making your site load as quickly as possible.

    What Is Google Page Speed Insights

    This is a tool provided by Google to analyse the way your site loads and where there are problems.

    More importantly it gives us a clue to bottlenecks, this video shows how to fix them.

    How Can We Fix The Issues

    In the video I will show you how to fix the most common page load speed issue.

    We will be installing a number of plugins and tuning page load speed.

    Video – Fixing Common Performance Problems

    Wrap Up

    Here are the plugins we used and the URLs mentioned in the video:

    Google page speed insights – https://developers.google.com/speed/pagespeed/insights

    w3-total-cache –  https://wordpress.org/plugins/w3-total-cache/

    WP Smush – https://en-gb.wordpress.org/plugins/wp-smushit/

    Scripts to Footer – https://wordpress.org/plugins/scripts-to-footerphp/

    If you need help optimising your site for speed, we have a fixed price performance tuning package, please check out our WordPress technical support page to get a no obligation quote.

    Photo Credit: Tilemahos Efthimiadis via Compfight cc

  • Experiments With Live Chat Software

    Experiments With Live Chat Software

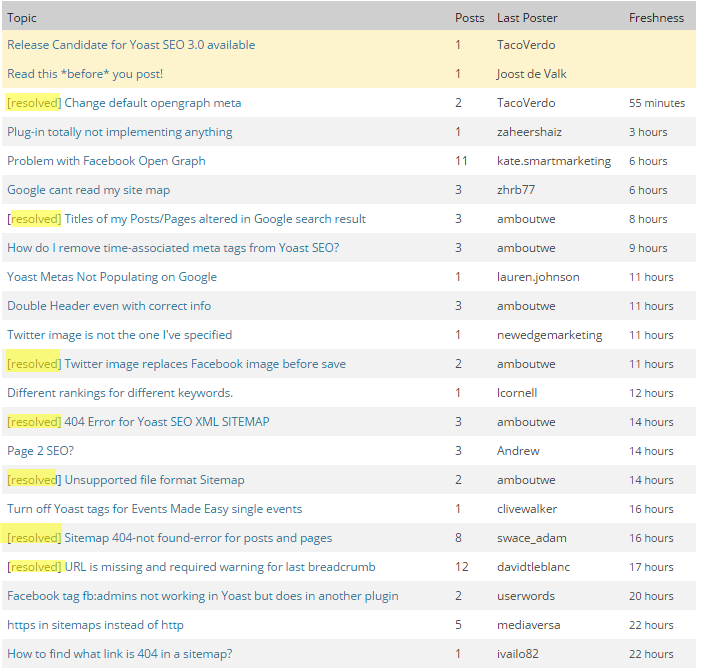
    I’ve been making experiments with live chat software as a way of increasing the number of conversions we get for our WordPress technical support services.

    In this post I want to tell you about what has worked and what hasn’t for me in my experiments with live chat software.

    What Is Live Chat?

    It’s real time chat messenger where you can “speak” with an agent at a company.  Look at the bottom right hand corner of your screen and you will see a subtle indicator 🙂 start a chat with me if I’m online.

    I’ve experimented with a number of solutions, my two favourites are Zopim and LiveChat, I’ll explain why I went with Livechat over Zopim a little later.

    LiveChat costs from $19 per month, there is a 30 day free trial to try it out, I’m coming to the end of my free trial as I write this and will be signing up for an account.

    Installation

    Most of the live chat systems have a WordPress plugin, simply validate against your account and the chat box is added.

    There are lots of options to customise the look and feel, you can change colours, location, add photos of agents.

    You can control where your livechat appear e.g. only have chat on specific pages such as sales pages.

    You can control when the chat popup appears, you can customise messages for new and returning visitors.

    There are analytics and back-end tools to see who is on your site in real time.

    How I’m Using Live Chat

    When a visitor comes to the site, my live chat kicks in after 20 seconds and an invitation to chat is made, this is automatic, I’m not involved with the chat at this point.

    I have three chat invitations, if you are on a none sales page you will see “Hello, is there anything I can help you with?”.

    If you are on my WordPress technical support page you will see “Hello, can I give you more details about our WordPress technical support services?”

    If you are on our WP Insure page you will see “Hello, can I give you more details about our WP Insure service?”.

    If a site visitor interacts with the chat and replies I get a ping on whatever device I’m logged into and I can start chatting with my site visitor.

    Making Myself Available For Chat

    I can make my self available for chat, so I don’t have to be online 24/7 if I need to do something else.

    There are apps for desktop, phone and tablet.  I simply login to the appropriate app and make myself available or not.

    If I’m online chats come to the app if I’m not chats are saved and send to an email supplied. I send these emails into our helpdesk for action whenI’m online.

    Integrations

    LiveChat has a huge number of integrations. two I have added are Freshbooks so I can create a quotation directly from a chat session and Mailchimp so I can add a chat client into my mailing list if they are interested.

    I mentioned help desk integration above, LiveChat doesn’t directly integration with Groove my helpdesk software, but I can forward chats and transcripts to an email address associated with my help desk.

    Results

    The results of using live chat have been exceptional.  It gives me a chance to explain how our services work, how much things cost and overcome any objections potential customers may have .

    I’ve converted site visitors to client on the spot by being available to answer their questions. I’m pretty sure potential clients would have left the site never to return if I was not available to chat.

    Live chat creates a sense of trust in a potential client, you communicate with them directly, they get a feel for your “voice” in the chat and know there is a real human on the other side of the inter-webs.  Bare in mind I’m based in the UK and most of my clients are international.

    I can pre-qualify potential customers, this is great from my point of view sending quotes and following up takes up a lot of my time.  I can see the country of the visitors so I can guess if they can afford our prices or not.  If you have a local company this is even more useful to qualify visitors.

    Converting visitors to leads not just clients. I hate to classify people like this, but using live chat you can turn casual visitors into email list subscribers and potentially down the road into customers.

    Availability Across All Devices

    There are apps for desktop, mobile and tablet, I can be available on live chat wherever I am not just in the office.  My business stretches across multiple time zones I’m not always at my desk when requests come in.

    I said I trialled Zopim and LiveChat earlier and the reason I went with LiveChat was the quality of the chat box on mobile devices compared to Zopim.  The zopim popup was barely visible compared to LiveChat I was not getting any chat sessions from mobile visitors.

    Negative Feedback

    There are a few downsides to offering a live chat on your site.

    Time suck; answering queries takes time and there are a lot of tyre kickers out there.  I’m also offering to help people who have come to the site to read a blog post and clarifying issues in  a post takes time.  Some site visitors expect a lot from a live chat.

    I get that live chat needs to be staffed correctly as I act more as a project manager for WPDude, this is part of my job . One visitor even asked why I offer help like that for free, my answer to be seen as an authority with the potential

    Having the audacity to offer services on a none sales page!  I used to have a generic popup saying “Can I tell you about our services”, a guy from Australia was reading my post on migration to WP Engine and he lost his sh1t with me because I dared to try and sell him services, so I changed to more neutral can I help for none sales pages, sorry angry Aussie guy.

    Leaving myself logged in when I’m not available has caused some issues.  People understand what live chat is and if you mark yourself as online they want a chat now.  I’ve had negative feedback for note reposing to a chat request, the solution I’ve set office hours to automatically log me out after 7pm UK time.

    Wrap Up

    So those were my experiments with live chat software, live chat will pay for itself over and over.

    I love the way I can answer any objections to using our services almost instantaneously and I am positive it has increased sales.  BUT staff it properly be ready to answer questions.

    Check out a free trial of LiveChat.


  • Will That New Plugin Break your Site?

    Will That New Plugin Break your Site?

    Here’s the scenario, you need to add feature X to your website, and you have found plugin Y that looks like it will do exactly what you need,will that new plugin break your site? How can you be sure it won’t break your website before you install it?

    There are a huge number of plugins out there, some are excellently coded and won’t cause you any issues, others are not so great.  There is no peer review of plugins before they are uploaded to the plugin repository how can you tell what is good and what is not?

    As a techie, I can review code and spot dud plugins, but how does a business owner with a website as opposed to a website developer check the validity of plugins with limited technical skills?

    Here is my 6 step plugin check list.

    Where Are You Downloading The Plugin From?

    The source of your plugin can impact on the quality, I strongly recommend you only download plugins from the legitimate WordPress repository

    If you search for and install a plugin from your WordPress dashboard it will always come from the repository wordpress.com/plugins.

    Installing plugins from none-trusted sources also opens up the e-door to malware installs and hack attacks.

    The exception to this rule is premium plugins that are supplied to you after you have paid. I’ll talk about that a little later.

    If the plugin is uploaded to the repository it is scrutinised by the wider WordPress community, developers will see if the code is good, the will rate it and  provide you with a suite of validation tools which I will talk about now.

    Reviewing Plugins On The Repository

    Before you add a new plugin to your site, take a little time to review the plugin page on wordpress.org and check a few indicators to see if it is well written and supported.

    Here is a sample page for a really well written and supported plugin Yoast SEO.

    2015-11-12_1032


    1) When Was It last Updated

    The first thing to check is when was it last updated, is the plugin being actively developed.

    As WordPress is developed, so plugins need to be developed to be kept in-line.  Security breaches are noted and things need to be constantly updated.

    If a plugin has not been updated in the past year that should raise alarm,  plugins that have not been updated in two years also get a banner alert at the top of the page.

    2) Has It Been Tested Against your Version Of WordPress?

    There are two indicators to look at here, version compatibility and compatible up to (see image above) if they do not meet your current version of WP there may be issues.

    3) Active Installs

    If your desired plugin has only been installed on one other site, there is probably a very good reason.

    Look for plugins that have a large user base.

    If your plugin is very niche. you may have to take a chance and go with a low install number, that plugin to monitor penguin migration may only be used by you and tbe British Antarctic Survey.  You should probably test it in a staging area before using it in live.

    4) Ratings

    Have a look at the rating people are giving to the plugin.  Are they mostly above 3 stars?

    Rating systems can be rigged so I like to look at 4 star ratings, they tend to give a more rounded view of the plugins performance.

    5) Documentation

    Is the documentation on how to install and configure the plugin good?

    Quality documentation can be a good indication of how good a coder the person is.

    6) Support

    Is the plugin being actively supported by the developer?

    Do they respond to queries quickly and provide solutions.

    Here is the support forum for our test plugin https://wordpress.org/support/plugin/wordpress-seo.  We can see that lots of requests are coming in and being resolved quickly, this looks like good support.

    2015-11-12_1046

    Look at the tone of the replies by the developer are they being helpful or dismissive.

    A point to note, most plugins are free and so is the support, sometimes developers can get snappy with people who are not helping themselves first by demanding support as if it is a right.

    You can tell if the respondent is the developer of a plugin, they will have  a badge against their name.

    2015-11-12_1048If They Fail The Test

    In the words of the great song smith Burt Bacharach and Chanteuse Dione Warwick, simply Walk On By.

    For every plugin out there, there is nearly always another one doing the same job, look for the similar one that passes the 6 point test.

    Emergency Fix

    So you have installed a plugin and it crashes your site, and you cannot login to delete it, what now.

    If you have access to FTP or a file manager on your hosting account, navigate to wp-content/plugins and simply delete the offending plugin directory.

    Staging Area

    It’s a good idea to setup a staging area so you can test new plugins before installing them to your live site.

    A staging area is a duplicate of your live site with the same, plugins, theme and content, it allow you to add new feature without worry.

    Many of the new hosting companies such as WP Engine offer staging areas, or you could look at WP Stagecoach or manually build a development area with plugins.

    Wrap Up

    The massive diversity of WordPress plugins is what makes WordPress so powerful, there is always a plugin out there to do that thing you want to do.

    Quality varies, will that new plugin break your site? Use this 6 point check list to only install high quality code.

    Photo Credit: garryknight via Compfight cc

  • How To Edit WordPress Files Without FTP

    How To Edit WordPress Files Without FTP

    UPDATE APRIL 2017 – This is a better plugin https://en-gb.wordpress.org/plugins/file-manager/

    Sometimes you need to edit some system files on your WordPress site, but how do you do this without access to FTP, the answer is a great plugin called WP-Filemanager.

    https://wordpress.org/plugins/wp-filemanager/

    In this post I will show you how to edit WordPress files without FTP.

    What Is FTP

    Just in  case you have not used FTP before, it stands for file transfer protocol, which is a techy way of saying we can upload / download , edit and delete files from your website using an FTP client such as filezilla.

    Think of it as a file manager for your Website where you can upload / download files, edit them and delete them.  The problem is you need to know your your host name, login name and password, sometimes you don’t have access to this information, or don’t know how to use FTP.

    Files Your May Need To Edit

    When we talk about editing files for WordPress, we are not talking about data for posts and pages, that is all held in your database, but WordPress also has a series of files that you upload which may need to be edited, they include.

    • wp-config.php – the configuration file which controls your site.
    • .htaccess – often update for specialised plugins.
    • theme files – if you need to edit your theme files, some files are buried deep and cannot be edited from appearance -> editor.
    • Plugin files – if you want to custom code plugins.

    My Usual Warning

    I’m giving away guild secrets here, if you are not 100% sure what you are doing hire a certain company to do your WordPress techinical support.

    Please backup, and please be aware you can crash your site if you edit files incorrectly like .htaccess or wp-c0nfig.php  To this day I’m crashing WordPress sites by editing theme files and adding incorrect php statements, you have been warned it happens to the pros too.

    Installing And Configuring WP-Filemanager

    Installing WP-Filemanager is like any other plugin, install it in the usual manner, BUT there is some technical configuration required.  I’ll show you exactly how to do this in the video, but to configure the files you need to know the document root of your website.

    I like to use serverbuddy to find out the document root, you can download this at https://wordpress.org/plugins/serverbuddy-by-pluginbuddy/

    Security Concerns

    By adding wp-filemaager you are quiet literally leaving your keys in your car while you go to the shops, it’s not a good idea to leave this installed if you have multiple users on your site who could access and edit files.

    If a hacker gets in they will thank you greatly for making their job that much easier.

    Install and delete wp-filemanager as you need it.

    VIDEO – How To Edit WordPress Files Without FTP.

    Here is our video tutorial to install, configure and use wp-filemanager.

    https://youtu.be/zSOpaRYMUf8


    Video Notes

    In server buddy we are searching for DOCUMENT_ROOT

    Photo Credit: Vegansoldier via Compfight cc

  • [VIDEO] Understanding WordPress Users And Roles

    [VIDEO] Understanding WordPress Users And Roles

    Here is a video tutorial I recorded a few years back on understanding WordPress users and Roles.

    If you have a multi user site and want to delegate content creation tasks, then understanding users and the roles they have is very important, in this video I talk about the main roles in WordPress and what tasks they can and cannot do in the WordPress dashboard.

    We will look at the following roles:

    • administrator
    • editor
    • author
    • contributor
    • subscriber

    Downloads

    Feel free to download a copy of the webinar slides

    Download slides
    Photo Credit: a God’s Child via Compfight cc

  • Jing Makes Me Sing

    Jing Makes Me Sing

    One of the tools I use every single day to help communicate with clients and my team is Jing, in this post I want to talk about Jing and explain how incredibly useful it is to communication when clients or team members work remotely from each other.

    What Is Jing?

    more-ballJing is a small free  utility that once installed sits on your desktop as a small yellow sun like icon.  When you click on it a selection tool appear so you can grab a screen shot or record a short video of what is on your screen.

    You can get a free download from this link https://www.techsmith.com/jing.html

    Screen Grabs

    The first function is to create a static screen dump, this is one I took while writing this post.

    http://screencast.com/t/31xxbUuN

    Once captured the screen dump can be saved locally or much more usefully uploaded to a cloud server and and share (see link above)

    Annotating Screen Dumps

    Once a screen dump has been captured we can also add annotation or highlighting to make it more obvious as to what we are taking about

    http://screencast.com/t/In6YIAiL9

    Videos

    The other great feature of this utility is that we can create short video screen casts of  what we are doing.

    http://screencast.com/t/YkPny4HA0Fl

    http://screencast.com/t/In6YIAiL9

    Videos With Audio

    Finally we can also add an audio narration of what we are doing to make things even more clear.

    http://screencast.com/t/ho2vvp6ZP

    Storage Space

    As everything is uploaded to the screen cast servers for sharing, we cannot expect unlimited space, at the time of writing there is “GB of free storage and the ability to buy additional space.

    I’ve been using this for years and I can only remember one time when I ran out of space, I went into my screen cast account and deleted everything more than 3 years old.

    I recommend Jing as a tool to communicate in the short term not for creating long term training or support videos / screen grabs.

    Usages

    Here are some of the ways I use Jing everyday.

    • Showing team members where a problem is, if it’s a complex bug, I will record a video to show exactly what needs to be fixed.
    • Clarifying issues, for example 10 minute ago one of my team members was asking about a license key, I had no idea what he meant so he sent me this http://screencast.com/t/otRN43G1fsmj
    • I use Jing for short client training video when I am handing over a change to their site training I record a video to show them how to do things
    • Clients send Jing messages to me to show me an issue they are having when they retain us for WordPress Technical Support issues, a picture is worth a thousand words, a video a million, when you are remote it makes it much easier to troubleshoot an issue.

    The list goes on, the underlying take away is Jing give great clarity to issues that a text based message cannot

    Camtasia

    If you want to record longer videos and edit them, the big brother of Jing is called camtasia, I use this for my long form  training videos that I want to record and edit before uploading to Youtube.

    Wrap Up

    When you work remotely from clients or team members the ability to send visual clues rather than text messages will stop the headaches of misunderstanding.

    If you want to send me a jing screen cast or screen dump of your WordPress issues I would happily send you a no obligation quote.

    Photo Credit: davidcrow via Compfight cc