Neil Matthews

Category: General Blogging

  • Can I Smush It, Yes You Can!

    Can I Smush It, Yes You Can!

    Large images slow down the load speed of your WordPress site.

    Clients and Google don’t like slow sites, clients get impatient and click away, Google will affect your rankings if you have a slow site.

    There is a way to compress your images and make them smaller so they load more quickly.  You can do this with the plugin WP Smush https://wordpress.org/plugins/wp-smushit/

    We were asked to tune the performance of one of our maintenance clients sites and one of the things we did was optimize his images.

    How Do I Know If I Have The Issue

    A quick test to see if you have image load problems is to go to the Google page speed insight page and test your site

    https://developers.google.com/speed/pagespeed/insights/

    If you are told to optimize your images, WP Smush will help.

    pagespeed

    What It Does

    WP Smush losslessly (is that even a real word) compresses your images files.

    Say again; WP Smush removes all the unnecessary stuff contained in your images files such as date and time stamps, device used to take a picture etc, there is a lot of meta data in an image that can be stripped out without affecting image quality, that is why it is lossless compression.

    How It Does It

    Once you have installed WP Smush a new menu item is added under media -> wp smush.

    In there you can batch smush your existing images.

    It’s a pretty slow process, so settle down for the long haul with a nice cup of the beverage of your choice.

    The free version smushes 50 files per pass, the pro version smushes everything in one go.  I’m cheap so I just clicked the smush button 16 times.

    Ongoing Smushing

    As you add new image into your site, they are smushed automatically on upload so the initial bulk smush is a one off process.

    The Result

    Our clients site load speed increased a lot.

    Performance tuning WordPress sites is a bit of a dark art not a science, with a mixture of cache plugins, CDNs, smushed images and decent hosting you can get great speed gains.

    WP Smush is definitely now part of my tuning tool box.

    Wrap Up

    If you need help speeding up your WordPress site check out our maintenance plan, as a matter of course we optimize our clients site speed.

    Photo Credit: Dorsetfella via Compfight cc

  • Plugin Review: Download Monitor

    Plugin Review: Download Monitor

    One of our maintenance clients came to us with a little challenge and asked us to recommend a plugin that counts downloads of PDF files they make available to their customers.

    Added this she wanted to know which individual logged in users also downloaded the file.

    This type of detailed knowledge of what people are doing with your downloads is important in many ways, how are clients using your information?  Is it useful enough that people even want to download it.

    We went on a search and found Download Monitor to fit the bill.

    What Is Download Monitor

    It’s a plugin that lets you create a series of downloadable files in the backend of WordPress.

    It controls who can download them, any user or logged in users.

    It creates a shortcode so you can embed those files in posts or pages

    Finally any most importantly it allows us to log and record downloads as a total per file and by user.

    Adding A File

    Adding a download file is much like creating a new blog post, give it a title, add some descriptive text about the file to be displayed.

    Then you upload the actual media file.

    Click for full size image
    Click for full size image

    Once added you can set various options for the file, one very useful one is to restrict logged in users to download only.

    Click for full size image
    Click for full size image

    Embedding A File / Download Links

    The file to be downloaded can be added as a shortcode into a post or page  as an example.

    [download id="11347"]

    Or you can send out a special download link to the file rather than a direct link so downloads can be recorded, here is an example of this.

    https://dev.neilmatthews.com/download/11347/ (don’t click the plugin has been deactivated)

    Logs

    This was the main feature my client needed, a log of who had downloaded a file.  We can see a log of total downloads or we can see a list of individual downloads by user

    Click For Full Size Image
    Click For Full Size Image
    total_downloads
    Click For Full Size Image


    All of this data can be downloaded as a CSV file for deeper analysis.

    Wrap Up

    If you want insights into what is being downloaded by your site visitors or logged in customers Download Monitor is the best out there.  We tested about 12 other plugins and this came out tops for reporting.  Many can create the total download number but none gave us per user logs.

    One of the services we offer to our maintenance clients is a plugin finding and testing service, why not give us a go.

    Photo Credit: 5500km via Compfight cc

  • Plugin Review: Revive Old Posts

    Plugin Review: Revive Old Posts

    Lets admit it, feeding the social media beast with new content is a huge time suck.

    I don’t have time to be continually sending links to Twitter, Facebook et al, so I’ve been experimenting with an automation tool to keep a continual stream of content going into my social media accounts.

    That tool is a plugin called Revive Old Posts https://wordpress.org/plugins/tweet-old-post/

    How Revive Old Posts Works

    Once installed a number of links are created to the application programming interface (API) of the social media platform of your choosing.

    The free version gives you Twitter and Facebook, the pro version gives you Linked In, Tumblr and Xing (no I’ve got no idea either).  I’ve only used the free version so I’m not going to dig into pro features at all.

    Twitter is a simple setup, login to your account and authorise the app

    Facebook is a bit more complex, you need to create an app on Facebook and link your website to it, sounds complex but there is a pretty good step by step guide to get you setup.

    Scheduling Posts

    Once you have linked up your accounts it’s time to select your content and set a schedule.

    You can select posts pages or any custom posts types.

    You can select one or more categories for your posts.

    You can set minimum age of your content, so, for example only post content more than 30 days old.

    You can set how many to post.

    You can set the hourly interval between posts.

    Click for full size image
    Click for full size image

    The Pros

    The plugin works flawlessly, posts were pushed up to Twitter and Facebook as expected.  I cannot fault the plugin.

    The Cons

    If you have hundreds of posts, not all of your content is suitable for automatic revival. I had posts about offers I’m no longer offering pushed up.

    I had posts about plugins that have been sunsetted and are no longer available. I had old members only content pushed to Facebook.

    I had to go through a laborious process of setting up a category of classic posts I wanted to revive.  It was pretty tedious but only a one time thing.

    I was running a test using webpolyglot too and I don’t have a huge number of posts so the revivals were getting a little repetitive.

    People know it’s old stuff so you had better be present to make some in person social posts or it looks a little canned.

    Don’t go mad, one post a day is more than enough.  I had it scheduled to push every 7 hours and there was a lot of automation and not much social chatter it didn’t look great.

    As you can see the cons are about content not Revive Old Posts the plugin.

    Wrap Up

    If like me you are too busy doing client work to spend huge amounts of time feeding content to the social media beast revive old posts is a great tool,

    Spend a little time to curate your old content to only push your best stuff out.  Then sit back and enjoy one less thing on your daily to-do list.

    Will I continue using Revive Old Posts? Yes, but I’m planning on creating a group of my top 50 posts and pushing them out one per day as part of my broader Facebook marketing plan.

    Photo Credit: bbaltimore via Compfight cc

  • Jing Makes Me Sing

    Jing Makes Me Sing

    One of the tools I use every single day to help communicate with clients and my team is Jing, in this post I want to talk about Jing and explain how incredibly useful it is to communication when clients or team members work remotely from each other.

    What Is Jing?

    more-ballJing is a small free  utility that once installed sits on your desktop as a small yellow sun like icon.  When you click on it a selection tool appear so you can grab a screen shot or record a short video of what is on your screen.

    You can get a free download from this link https://www.techsmith.com/jing.html

    Screen Grabs

    The first function is to create a static screen dump, this is one I took while writing this post.

    http://screencast.com/t/31xxbUuN

    Once captured the screen dump can be saved locally or much more usefully uploaded to a cloud server and and share (see link above)

    Annotating Screen Dumps

    Once a screen dump has been captured we can also add annotation or highlighting to make it more obvious as to what we are taking about

    http://screencast.com/t/In6YIAiL9

    Videos

    The other great feature of this utility is that we can create short video screen casts of  what we are doing.

    http://screencast.com/t/YkPny4HA0Fl

    http://screencast.com/t/In6YIAiL9

    Videos With Audio

    Finally we can also add an audio narration of what we are doing to make things even more clear.

    http://screencast.com/t/ho2vvp6ZP

    Storage Space

    As everything is uploaded to the screen cast servers for sharing, we cannot expect unlimited space, at the time of writing there is “GB of free storage and the ability to buy additional space.

    I’ve been using this for years and I can only remember one time when I ran out of space, I went into my screen cast account and deleted everything more than 3 years old.

    I recommend Jing as a tool to communicate in the short term not for creating long term training or support videos / screen grabs.

    Usages

    Here are some of the ways I use Jing everyday.

    • Showing team members where a problem is, if it’s a complex bug, I will record a video to show exactly what needs to be fixed.
    • Clarifying issues, for example 10 minute ago one of my team members was asking about a license key, I had no idea what he meant so he sent me this http://screencast.com/t/otRN43G1fsmj
    • I use Jing for short client training video when I am handing over a change to their site training I record a video to show them how to do things
    • Clients send Jing messages to me to show me an issue they are having when they retain us for WordPress Technical Support issues, a picture is worth a thousand words, a video a million, when you are remote it makes it much easier to troubleshoot an issue.

    The list goes on, the underlying take away is Jing give great clarity to issues that a text based message cannot

    Camtasia

    If you want to record longer videos and edit them, the big brother of Jing is called camtasia, I use this for my long form  training videos that I want to record and edit before uploading to Youtube.

    Wrap Up

    When you work remotely from clients or team members the ability to send visual clues rather than text messages will stop the headaches of misunderstanding.

    If you want to send me a jing screen cast or screen dump of your WordPress issues I would happily send you a no obligation quote.

    Photo Credit: davidcrow via Compfight cc
     

  • Ignore Cleaning Up Spam At Your Peril

    Ignore Cleaning Up Spam At Your Peril

    There is a small maintenance task that most WordPress site owners ignore at their own peril!

    That is the task of cleaning up spam comments.

    The Problem

    As we all know there are spammers out there trying to leave comments on our WordPress sites in the hope of getting a link back to their hapless sites and improve search engine ratings.

    At the time of writing I have had 242,034 spam comments blocked by my anti spam plugin.  I’m pretty mean I disable comment on my posts after 14 days so there are very few posts to leave spam comments on.  So my spam issue whilst huge is pretty small compared to some people.

    The problem is those spam comments all take up valuable resources on your site and if they are not cleaned down it can crash your site.

    Spam Bots

    Spam is automated via scripts and if a spam bits finds a chink in your armour, you can be sure they will blast your site with repeated spam attempts.

    This automation can lead to problems with massive database tables, I’ve seen sites with millions of rows in their comments tables because spam comments have been left in the system.

    Impacts Site Performance

    Massive databases are very often the root cause of many slow loading WordPress sites.

    If we go back to the Spam bots above, as they continue to smash your site with spam, they hit an already slow loading database and the problem becomes  a vicious cycle.

    Case Study – The Site that Crashed

    One of our maintenance clients came to us with stability issues, they could not quiet put their finger on why, but their site kept behaving erratically.  They had 60K+ spam comments in their queue.

    This in turn had created a database table that was 130MB in size and had  become corrupt.  As comment crons tasks were running, it was causing his site to crash.

    I fixed the table with phpmyadmin, removed the spam comments and optimized the database, weird unstable issues vanished.

    What To Do

    Enough with the waffle already how do I fix it?

    Empty you spam and purge all spam comments. See screen shot

    Click for full size image
    Click for full size image

    If you have a huge number of spam comments, this might time out and you will have to click empty spam a number of times.

    The optimize your database to remove references I like a tool called wp-optimize to do this, check out this post for details on optimising.

    Wrap Up

    Why not take a 30 day free trial of our maintenance service, we will clear up your comment spam and harden your security just as a thank you for signing up.


  • We Are Oh so Vulnerable To The WordPress Vulnerabilities

    We Are Oh so Vulnerable To The WordPress Vulnerabilities

    This week has been a big week for security flaws showing up in WordPress.   There have been a number of WordPress vulnerabilities surfacing.

    Firstly we had news that a huge number of plugins were using a feature of WordPress incorrectly due to poor documentation and exposing WordPress sites to script injection hacks. You can get full details here http://wptavern.com/xss-vulnerability-affects-more-than-a-dozen-popular-wordpress-plugins

    The plugins in question were big name ones.   Plugins that I use on almost every site I build, so this was a BIG  issue.

    Secondly WordPress itself released a security patch to close another loop hole that had been found. Again full details here http://wptavern.com/wordpress-4-1-2-is-a-critical-security-release-immediate-update-recommended

    We spent a lot of time updating and testing sites this week.

    I recommend you finish reading this post, backup your site and apply any updates your site needs now.

    I Cannot Stress The Importance Of Updating

    I recommend to all site owners that they apply updates to WordPress, plugins and themes as they are made available.  The eco-system of WordPress is vast with a huge combination of plugins, themes and versions of WordPress, you need to keep everything up to date to keep hackers at bay.

    I check client sites daily for updates, over and above updating I also harden security on WordPress sites.

    My Security Regimen

    Here’s what I do to my clients sites and my own.

    • Take daily backups so i can recover in the event of a hack
    • Update everything regularly (we check daily on our sites)
    • Delete unwanted / unused plugins, just because they are not active does not mean hackers cannot exploit code
    • Install a security monitoring solution to spot hack attempts and send alerts. My current favourite it iThemes Security
    • Harden security to stop hackers making changes – again use iThemes security to do this

    Check Out WP Insure

    Yes this was all a thinly veiled sales pitch, our WP Insure service which was designed to keep your site up to date and secured.We keep everything update to date, harden security and monitor your site for any issues. Why not take our a 30 day free trial to test drive our service.

  • Our Process For Working On Your Site

    Our Process For Working On Your Site

    Last week I wrote about the process we use for Working on Projects Across Timezones, in this post I want to talk about our process for working on your site.

    Service Delivery

    Once we have accepted your project, the invoice is paid and we have all the login details we need, the next step is to actually deliver the service you paid for.

    To ensure we deliver the same quality over and over again we have built a process that all our developers work to.

    Schedule Work

    The project manager looking afer your job (look at me pretending to be Billy Big Biscuits, you all know it’s me Neil doing that work 🙂 but one day there will be more than one project manager) will schedule the work, it’s added into our team diary in Trello.

    We assign the job to a team member,  and on the scheduled day work begins.

    Starting Work Email

    The first thing we do is send you an email letting you know we are starting work on your project.

    We feel this is important because we work across timezones and you may have no idea when we are working on your site.

    We introduce the team member working on your site and ask that you stay off the site while we are making changes to stop any conflicts.

    You Are Only As Good As Your Last Backup

    A mentor of mine from the bad old days in corporate IT, hammered this statement into me over and over, you are only as good as your last backup.

    The first thing we do when working on your site is take a full backup.  We then test that backup to make sure we can recover from it.

    We know we can get your site back to the way it was before we got our sticky fingers on it if there are any issues.

    Maintenance Mode

    If we are doing a job on your site that will impact on site visitors we will put your site into maintenance mode.

    We like this plugin https://wordpress.org/plugins/wp-maintenance-mode/ what it does is put up a maintenance mode screen that is shown to visitors visitors that are not logged in.

    We can see the changes being made and can test everything behind a firewall so you visitors never see a sub -standard in process build.

    If you run any advertising or promotions to bring in visitors it’s a good idea to stop these for the duration of our project or your fees will be wasted.

    Cloning Site

    If we are doing custom development work, we like to clone your site to a staging area and do all the work there.

    This means we never impact your live site.

    Development is exactly that, a series of changes that can crash your site or cause issues. Doing it on a staging area is industry best practise.

    Once we are done and you have tested and approved the work, we make that staging site live.

    Do The Work

    Depending upon the type of job we have internal processes.  We have procedures to:

    • Troubleshoot crashed sites
    • Fixed and harden hacked sites
    • Performance tune a site
    • Install and configure a multi language site
    • Build a new site

    I’m always looks at the trends of work we get in and will create new procedures if required.

    Want to see our troubleshooting methodology video?

    End Of Day Update

    If you live on the west coast of the US, mid morning is end of business for me in the UK.  We make sure we keep our clients appraised of the work done on their project at the end of the day if the job is rolling over to the next day.

    We send out a small email saying what is complete, and what we still need to do.

    Project Complete QA Time

    Once we have completed your job, we move into QA or quality assurance mode.

    We will write up a report of what has been done, and how we did it.

    We pass the site back to you for review and comment.  It’s at this stage you review the work and let us know if you are happy or if you want additional changes to be done.

    If there is additional things to be done, we cycle back into service delivery mode.

    We won’t close a project until you are 100% happy.

    This is an area I’m constantly reviewing to make sure we deliver with excellence but still take on new work.  I’m currently assigning one new task per team member per day and leaving them scope to work on QA tasks too for on-going jobs.

    Project Closed

    Once you are happy we mark the project as closed.  We all don ceremonial gowns and process towards the stone alter where we burn the papers containing your passwords .. nah not really I just click the button marked close

    Click for full size image

    Follow Up

    After three days your closed job is moved to a new queue where we do a quick courtesy follow up.

    We check in to make sure everything is still as it should be and that we have not missed anything. If there are problems we cycle back to service delivery.

    We also offer a free trial of our maintenance service WP  Insure as a thank you for working with us.

    We mark your job as checked and it is deleted (passwords gone for security reasons).

    Outro

    Hopefully this post has given  you a glimpse behind the curtains of how we work on your site and increases your confidence in working with us.

    If you want to work with us the first step is to tell us all about your issue on our WordPress technical support page.


  • How We Manage Projects Across Timezones

    How We Manage Projects Across Timezones

    One of the biggest problems inside of WP Dude is managing projects and people across multiple time zones. In this post I was to tell you about the systems we have put in place and how we manage projects across timezones.

    The Issue

    We have clients from every continent except Antarctica, but the majority of our work comes from the US.

    I’m based in the UK and I have developers in the UK and the Philippines.

    Often there is only a small online overlap between me, my clients.

    My developers in south east Asia are clocking off just as I come online in the morning.

    As a result there can be prolonged periods of quiet time when emails are not answered or answers to questions cannot be obtained.

    Too Many Dropped Balls

    As we have become busier, more and more projects were being juggled and we began to metaphorically drop the balls.

    Projects schedules were missed.

    Quotes were not sent out.

    Clients were not updated on progress of the projects.

    This will only get worse as our business grows even more so we needed a solution.

    The System

    We have a system for managing all our projects across timezones and making sure you the end client knows exactly where we are with your project.

    1. The Request

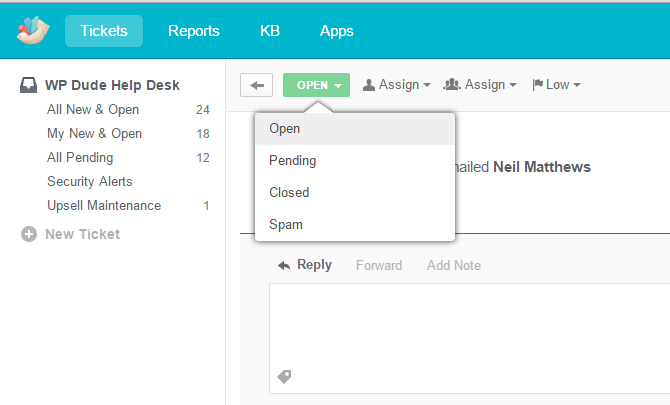
    The first stage of a project is the request.  A client requests one of our $99 jobs and a ticket is raised in our Groove helpdesk.  At that point an automated email is sent out saying:

    Thanks for contacting us about your WordPress issue, as you no doubt realise this is an automated email to let you know your request has been received.

    We aim to get back to you within 24 hours.  Our office hours are 8-am – 6pm Monday to Friday, if you contact us outside of those hours it may take a little time to get back to you, and we ask that you are patient with us.

    We look forward to working with you.

    We are setting expectation here and letting potential clients know we will get back to them within a day.  My first task of the day is to pickup and requests that have come in overnight.

    2. Do We Want The Job?

    At heart I’m a people pleaser and I try to say yes to everything, but that has to change as WP Dude grows.  We now have a rejection system.

    We don’t accept sites that are the three Ps  Porn, Pharmaceuticals or Pyramid schemes.

    We only take on small jobs now, so no custom theme development, no custom plugin development and no graphical design.

    We work via email so the many requests that come in simply saying “Call me (999) 999-99999” (yes some people are that rude) are rejected.

    Going with my gut is also something I’m going more now.  I can read between the lines on some requests and I know that project is not a great fit for us and I’ll politely decline.

    We reject projects with a polite canned response email. Saying no is hard but I want us to deliver with excellence to the people we say yes to.

    3. Getting More Information

    Sometime the request is a little too vague and we need more information, so step three is sending a canned response asking for more details.  This job is then marked pending and we have a process to check back in on these projects and follow up if we don’t get the info we need to start work.

    4. The Quote

    Even though we have fixed price jobs I still send out a quote.  This contains our terms and conditions, accepting the quote then accepts our T & Cs.

    Like step 3, jobs are marked as pending until the quote is accepted.

    When you the end client accepts the quote we get a notification in Groove which marks your job as live.  This is an integration in Zapier between Freshbooks and Groove.

    5. Login Details & Invoicing.

    Once you have accepted our quote we transfer that to an invoice and send it for online payment.

    At that point we also send out a canned response asking for login details.

    I need the following login information so I can begin work.

    admin level WordPress user ID and passwordI recommend that you change the password for the duration of this assignment, to do this visit the dashboard of your blog and click on users->authors & users -> click on edit for the appropriate user and at the bottom of the page is a change password option.

    FTP login ID, password and URL

    This information should come from your hosting provider, this will enable me to upload and download files should I need to .

    I may not need all of the passwords but I find if I have all of them to hand it speeds up the process.

    I will begin work once I have this information.

    The project is live at this stage so it remains open while we wait for the login details.  We are notified when login details are received.
    I’m at a cross road with points 4 & 5 I could automate these even more by taking payment when the request is sent, please leave feeback in the comments below about whether you feel better about a less automated payment process?

    6. Scheduling

    At this point we drop your project into our team diary and schedule the work.  We use a series of Google Calendars to schedule everything across the team.

    We send out a small  canned response saying when your work will be done. This may sound like a small item, but for some reason I completely missed this out of the project flow and many clients were left wondering when their actual project would be worked on.

    7. Starting Work

    We send out a courtesy note when we start work to ask our clients not to do anything on their site until we have completed our work.

    My name is %{agent_firstname} and I’m one of the Developers at WP Dude.

    This is a quick courtesy email to let you know I will be working on your project and that I am starting now.

    To avoid any conflicts can I ask you to please not add any new content or make changes to your site until the work is complete.

    I’ll be back in touch soon with a progress update

    Depending upon who is working on your project you may have a new team member working with you so a quick introduction is on order.  It is also a confirmation that the work is getting done.

    7. Service Delivery

    I’ll write up another post about actually doing the work at a later date, but this is where the work gets done.

    8. Quality Assurance

    Once we have done the work, we send it back to you the client for approval or updates. We will never close a project until you are 100% happy.

    This is complex part of our system  we send out another canned response saying it’s ready for review and it may be some time before the clients response.

    If there are additional QA tasks to perform we loop back to service delivery mode.  We need to build slack into our scheduling at point 6 to allows for QA work and not have it impact new jobs.  This is still something I’m struggling with and I’m looking at now. The need to quickly work on new projects but still attend to QA work is hard.

    9. Close project

    Once everything is done to your satisfaction we internally close the project down, delete any password we have.  Everyone puts their feet up and has a nice cup of tea 🙂 I wish.

    10. Follow Up

    We have a timed rule that after 72 hours your closed job is dropped into our follow up queue, we reach out and ask if everything is still okay.  It’s not uncommon for something to be missed in the QA or something else comes to light after a few days of use.

    We send a canned reponse checking in we also use this touchpoint to offer a 60 day free trial of our maintenance service as a thankyou and as a upsell.

    It’s been a couple of days since we completed your WordPress project, this is a courtesy check in to make sure everything is working as expected.

    This is an automated message, but if you reply to this email it will re-open your project and we will fix any issues you are having.

    As a thank you for selecting WP Dude as your WordPress support and development team, we would like to offer you a 60 day free trial of our WordPress maintenance service WP Insure.  For full details please visit https://dev.neilmatthews.com/wp-insure.

    Wrap Up

    Systematising and automating our process has saved my sanity I’m sure.

    Creating a repeatable process is key to expanding the team, it’s not in my head any-more.

    If you would like to see the system in action go to this page and leave a stage 1 request.

    Next up in the series about telling you how we work, I’ll show you how we attempting to deliver our service with the same quality over and over via a repeatable process.


  • Plugin Review: WP Awesome FAQ

    Plugin Review: WP Awesome FAQ

    I was looking for a frequently asked question (FAQ) plugin so I could display the questions and answers of regularly asked questions people send to me before buying a WordPress support job from us. I looked through a number of FAQ plugins and eventually settled on WP Awesome FAQ.

    In this post I’ll tell you why I selected it.

    What Is  A FAQ

    An FAQ are those questions you find potential customers asking over and over again.

    These are obviously questions you have not addressed correctly in your sales copy and are creating objections in your clients mind before they buy your product or service.

    Creating a list of frequently asked questions (and of course answers) helps to overcome those potential custom objections and cuts down your customer support time.

    What I Needed In An FAQ Plugin

    I always approach hunting for a new plugin with a series of requirements in the back of my mind.  I wanted the following:

    • Easily create a series of FAQs on the back-end of WordPress
    • Ability to add new FAQs as they become available after client questions
    • An accordion functions to hide answers people don’t need so people can quickly scan through the questions
    • Short codes to embed the FAQ on sales pages and other pages

    WP Awesome FAQ Does All This

    As you might be guessing WP Awesome FAQ does all this and a little more, it also has FAQ categories so I can control which FAQs are displayed  and where.

    Downsides?

    I’m not 100% thrilled with the styling of the drop down content, for example I have some bulleted lists in there and the bullet point is dropped, I’m going to have to spend some time recoding the styling to get it 100% as I need it.

     See It In Action

    I’ve got the FAQ plugin installed on my home page, click through and have a look

    As you can see the shortcode presents a list of FAQs click on one and it opens up in accordion stylie for you to see the answer to your question.

    Here is a screen dump of the back end editor for your FAQs

    faq
    Click for full size image


    Outro

    Awe – noun – a feeling of reverential respect mixed with fear or wonder

    Can a plugin be really awesome?  Nah, but this fills the functionality hole on my site to perfection.

    If you have any questions about our services not covered in our FAQ please ask away and I’ll add them in.

  • Are You Mobile Enough For Google?

    Are You Mobile Enough For Google?

    Google is up-ing the stakes for the mobile web.

    They have looked into their cavernous store of data and deducted that more and more web searches are done from mobile devices.

    They are threatening to penalise websites that do not have an optimised mobile site!

    Are you mobile enough for Google?

    Google Webmaster Errors

    A number of my clients have received warnign messages from Google along these lines.

    Google systems have tested 67 pages from your site and found that 100% of them have critical mobile usability errors. The errors on these 67 pages severely affect how mobile users are able to experience your website. These pages will not be seen as mobile-friendly by Google Search, and will therefore be displayed and ranked appropriately for smartphone users.

    I think the telling statement is that you will be “ranked appropriately” , get a decent mobile site or have the fawcet of Google juice turned off.

    How To Tell If You Are Mobile Enough For Google

    The easiest way to check you are mobile friendly is to use Google mobile friendly test

    https://www.google.com/webmasters/tools/mobile-friendly/

    I’ll wait while you go off and check.

    What Are Your Options

    You need to make your site responsive.  This means your site will resize  to fit a mobile screen.

    There are three main option that I can see to fix your site if it fails.

    1) Re-Code Your Existing Theme

    The first and most expensive option is to hire a developer to recode your theme and make it responsive.

    Pros

    You will get a mobile match for your existing site

    You will get exactly the theme and layout you desire.

    Cons

    This is very much the most expensive option.

    It will take some time to code and test, there are rumours that Google are implementing their penalty in April.

    2) Buy A New Responsive Theme

    Go to on of the theme markets such as themeforest.net and buy a new responsive theme.  You can demo most themes so enter the demo URL into the Google tester URL to make sure it passes their test.  The vast majority of new themes are responsive already.

    Pros

    Much cheaper than custom coding, expect to pay less than $100

    Cons 

    You will need to setup a new premium theme, and change the existing look of your site. Depending upon the theme some setups can be complex.

    3) Install One of The Mobile Ready Plugins

    The quickest route to a mobile friendly website and the route I have suggested to my clients who have been impacted,is to install one of the mobile theme plugins.  These plugins detect when a site visitor is from a mobile device and show a different mobile ready theme.

    Here are some of the plugins that can do this work:

    Pros

    Quick, about an hours work to install and configure.

    Cheap, from free to approx $59 for a premium version.

    Cons

    You are limited to the look and feel the plugins provide.  These themes are pre-built, you can change colours and add logos but your design options are limited.

    Further Reading

    Here is Google’s very own  documentation on configuring a mobile ready WordPress site.

    https://developers.google.com/webmasters/mobile-sites/website-software/wordpress

    Wrap Up

    As we start to consume more and more of our content from phones, we need to make content readable and usable from small screens.  Google know this and that is why they are penalising people without responsive sites.  I strongly recommend you embrace mobile browsing.

    We can implement a premium theme (option 2) or install a mobile plugin (option 3) as one of our $99 jobs if you need help.

  • Plugin Review: WP Mobile Detect

    Plugin Review: WP Mobile Detect

    One of my clients came to me with an interesting issue.  She was embedding ads into her blog posts. they were wide ads 728 x 9 px and these looked great on desktop devices, but terrible on mobile devices.  Most of the ad was being cut off.

    She wanted a way to easily embed both mobile and desktop versions of her ads in her posts.

    You Can Code it up

    It’s a relatively simple job for a code monkey like me to write some scripts to do this, WordPress has a built-in function call wp_is_mobile that does exactly that.

    My client wanted to do this easily without coding so following my mantra of “there’s always a plugin to do that” I went hunting.

    Enter WP Mobile Detect

    The solution to the problem was WP Mobile Detect https://wordpress.org/plugins/wp-mobile-detect/.

    What this clever little plugin does is to provide a series of short codes that let you show or hide content based upon the device a user is using .

    You can target phones, desktops or tablets.  You can target operating systems like Android, iOS or Windows mobile.  You can also have combinations of them too.

    How It works

    You add a short code into your post wrapping the content you want to change, I’m not using the plugin on my site but here is an example

    [phone]

    This text would be displayed on phones

    [/phone]

    [notphone]

    This text would be displayed on desktops and tablets

    [/notphone]

    Other Short Code Available

    As I have mentioned there were other combinations available, here is a list of what you can do.

    • [phone]Put content here that you only want displayed on Phones NOT Tablets or Desktops[/phone]
    • [tablet]Put content here that you only want displayed on Tablets NOT Phones or Desktops[/tablet]
    • [device]Put content here that you only want displayed on Phones OR Tablets NOT Desktops[/device]
    • [notphone]Put content here that you only want displayed on Tablets OR Desktops NOT Phones[/notphone]
    • [nottab]Put content here that you only want displayed on Phones OR Desktops NOT Tablets[/nottab]
    • [notdevice]Put content here that you only want displayed on Desktops NOT Phones OR Tablets[/notdevice]
    • [ios]Put content here that you only want displayed on iOS devices[/ios]
    • [iPhone]Put content here, that you only want displayed on iPhones[/iPhone]
    • [iPad]Put content here, that you only want displayed on iPads[/iPad]
    • [android]Put content here, that you only want displayed on Android devices[/android]
    • [windowsmobile]Put content here, that you only want displayed on Windows Mobile devices[/windowsmobile]

    Not Just For Ads

    You can wrap any type of content in these short codes, for example a mobile friendly contact form as opposed to a long form that would be difficult to fill in on a phone.

    You could have a click to call button that only appears on phones that would be useless on desktop.

    Outro

    I love the fact that the WordPress community is developing solutions for nearly every issue there is and then distributing it as a free plugin.

    90% of the time building and maintaining a WordPress site is very easy, it’s the final 10% we are here for.

    Photo Credit: eatmorechips via Compfight cc

  • Speed Up Your Site With Plugin Organizer

    Speed Up Your Site With Plugin Organizer

    I’ve been using a plugin that is new to me called Plugin Organizer to speed up slow loading client sites and my own sites.

    I just wanted to share this knowledge with you, if you have a slow loading site.

    What Is Plugin Organizer?

    Plugin organizer is a plugin (no Sh!t Sherlock) that allows you to control where and when plugin are loaded.

    It allows you to control the order plugins are loaded, load plugins only for particular post types or not load a plugin on particular URLs.

    I’m writing a couple of posts to cover what it does, but in this on I want to look at excluding plugins to speed up page load times.

    Using Plugin Organizer to Speed Up Sites

    The way WordPress normally works is to load plugin code for a plugin across all pages,  the more plugin code loaded, the longer a page takes to render in a web browser.

    Why not stop plugins loading where they are not required.  Less plugin code = faster page load time.

    Finding What Plugins Are Loading On Your Page

    So the next challenge is to find out what plugins are loading on particular pages.

    There are lots of in-browser add-ons that allow you to see what plugins are being loaded, but my favourite is httpwatch.com.  You only need the free version BTW.

    Once loaded into your browser you can record what scripts and components are being loaded.  Use this list and search for anything under wp-content/plugins/{PLUGIN-NAME} and you will see plugin code.  Here is a screen dump from my home page with some plugin code highlighted.

    pluginorganiser
    Click for full size image

    Example

    On my site I use Woocommerce, but I don’t need Woocommerce to load on my main pages such as home, about hire us etc.  So I set about excluding this plugin from certain URLs.

    Step One – Install the plugin

    Step Two – Enable selective plugin loading, go to Plugin Organizer -> Settings, and check the box Enable -> Selective Plugin Loading:

    Step Three  – Add a plugin filter, go to Plugin Organizer -> Plugin Filter, add a new filter, give it a name, set the page URL and deselect the plugins from the list.  I was able to disable a large number for my home page

    Click for full size image
    Click for full size image


    Test Test Test

    We are fundamentally changing the way plugins work with these changes so this knowledge comes with a caveat to test, test and test again to make sure you posts and pages retain the functionality you need after excluding plugins.

    Wrap Up

    Next up I’ll show you another cool way to use plugin organizer when you get a plugin clash.

    If you are looking to speed up your WordPress site, I have a performance tuning package, why not get a no obligation quote for my fixed price performacne tunining package

    Hat tip to David Risley for alerting me to Plugin Organiser on this post

    Photo Credit: ahh.photo via Compfight cc