I’ve started to use an excellent tool called Canva.com to create images for blog posts, ads and other online needs, here is my video Canva review.
Canva is a freemium online image manipulation tool, I have been using it for about one month and as a non-designer I am very very happy with the results. It is free to sign-up but there are some advanced options which costs $11 per month.
I’ve struggled with very expensive and complicated image manipulation tools such as Photoshop. Canva solves that.
I’m no designer, Canva also solves that with pre-made look and feels.
Lets get into the meat of the review and check out my video review
Video
Wrap Up – Canva Review
Canva has changed the way I create images for the web and for my clients, it’s simple and convenient, there is no endorsement or affiliate gain here, it’s just a tool I’m using regularly.
Remember the attribution I mentioned in the video you can see that below.
The Facebook page plugin (or like box as it used to be called) is a way to showbcase your Facebook page on your website away from Facebook itself.
In today’s video tutorial I am going to show you how to add the plugin into your site. The facebook page plugin is some code that needs to be ibntegrated and not a plugin int he WordPress sense.
It captures all activity on your site. New posts, edits, starting and stopping plugins etc etc.
It records the time and date, what happened, the user that made the activity and the IP address. The IP address can be used to pinpoint the location of the user geographically if weird things are happening.
It saves this data to your dashboard so you can review what is happening.
Video
See the plugin in action.
When I’ve Used This Plugin
Hacks – I use this plugin when fixing hacked sites to monitor for the hackers getting back in
Multi user / admin sites – if there are multiple people editing or “admining” a site it is useful to know who did what./
Cover My Arse – This is a great fix for the you touched it last syndrome, using activity log you can see exactly who did what and when.
Bizzare plugin activity – one client was having their blog posts edited and no-one knew why, we found that an editorial calendar plugin was making changes
Options
There are a number of options for this plugin, the first is how much data to keep, this log will get large so having unlimited logging in place is a bad idea, the default is to keep 30 days.
There is a notification engine where you can set email alerts when certain things happen, for example if you are monitoring when a user logs in, you can setup a
Most of the time your WordPress site will chug along happily, but when it breaks, the information available to you is limited. Debugging your WordPress site to find errors is a pretty simple thing.
Trouble shooting any issues on your WordPress site becomes much easier if you put your site in debug mode. In this post I will tell you how to do that so you can get to the root of your problems more quickly.
Hidden Messages
By default WordPress or more correctly the underlying scriptng language php, hides it’s error and warning messages. It does this because many of the messages are just warnings and don’t need to be seen.
Enabling debug shows all these messages and more importantly shows any real errors that are happening on your site.
Frustrating White Screen Of Death
One of the most frustrating things that WordPress does is it’s white screen of death, when WordPress crashes it closes down and only shows a white screen, no messages, no warnings just a white screen.
When you enable debugging it shows those messages, it tells you which plugin is causing issues, it will tell you if you are out of memory, it will say which theme file is causing problems.
How To Enable Debugging
To enable debugging on your site you need to edit a file in the root of your site called wp-config.php.
Connect to your site using ftp and go to the root, you will see the file wp-config.php, edit that file and look for this entry
define( ‘WP_DEBUG’, false );
Change the false to true and debug is active.
Plugins
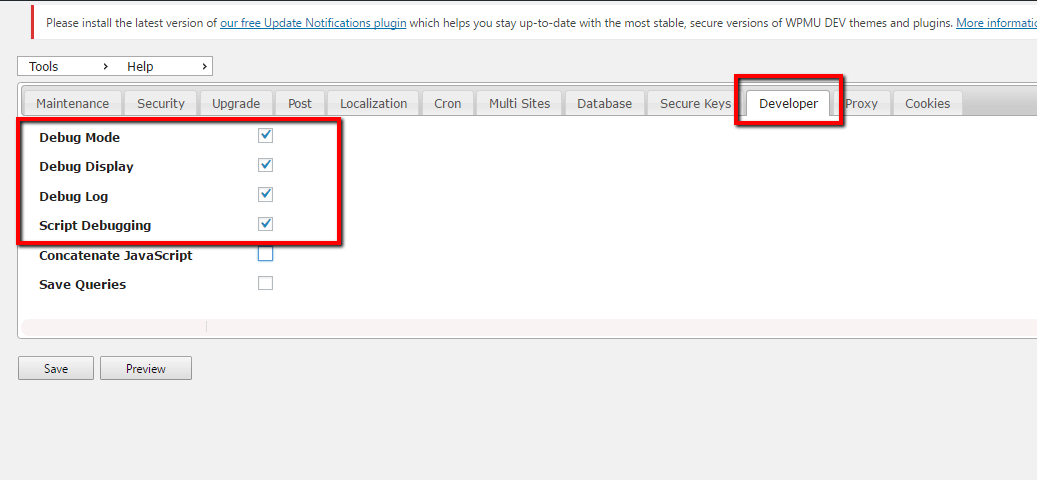
If you are not happy editing your wp-config there is a plugin that will enable debugging for you, it’s called WP Config File editor and can be downloaded from this link,.
Once installed go to WPCF Editor menu -> Developer and click the following options, debug will be activated.
What You Will See
First up don’t panic, your site will start to throw out lots of messages (a lot of messages) your site will look terrible, enabling debug is designed to be a temporary measure to debug your site.
All messages will be output, the important thing to note is the last message to appear on your screen will be the offending one, usually a fatal error message.
It’s hard to go into depth about the message but it will point to a theme file, plugin file or other error message.
Log File
If you have an intermittent issue, then you can enable a logging option and all messages will be sent to a log file at /wp-content/debug.log so you can review it at leisure when an error happens.
The important thing to note is that messages are sent to the log not to the screen so your site will look normal while collecting data. To do this add some additional content to your wp-config file
// Enable Debug logging to the /wp-content/debug.log file
define( ‘WP_DEBUG_LOG’, true );
// Disable display of errors and warnings
define( ‘WP_DEBUG_DISPLAY’, false );
@ini_set( ‘display_errors’, 0 );
// Use dev versions of core JS and CSS files (only needed if you are modifying these core files)
define( ‘SCRIPT_DEBUG’, true );
All message will then be sent to a file called /wp-content/debug.log.
Please note a lot of information is sent to the log and hte file can get pretty large pretty quickly.
Debugging your WordPress site helps troubleshoot your WordPress issue, if you are still stuck, tell us the problem and we can fix it as on of our WordPress technical support jobs.
It is a very common thing for us to get comments after we have worked on a clients site along the lines of “Since you did X with our site Y no longer works, you touched it last”.
It sparks a deep seated human reaction when you get criticism like this, but I’ve trained myself and my team to handle these situations like this.
Don’t Be Defensive to “You Touched It Last”
I’m working hard on this, but it’s a natural reaction to immediately go on the defensive when your work is questioned.
Whenever I get an email like this the defences still go up, my mind goes something like this “How can adding a contact form possibly impact the colours of their about page button”. I’m immediately thinking it’s not us why should I give over our precious time to help.
It’s a natural thing, the emails come across to us as a criticism, even though it is really a call for “Help!!!”.
Now, I put the email aside for a moment, go and do another task, make a cup of tea and let the initial adrenaline spike go. Then I address the problem.
Take Ownership
The first thing I do when we get a “you touched it last” is to take ownership of the problem.
We do this because customer service is important our client wants a fix not a “pass the buck”.
I say take ownership with a caveat, I’ve had “you touched it lasts” along the lines of six months ago you did Y and now X has broken. I will add the caveat that we are happy to roll back the changes we have made and test to see if it is causing the issues, but other things could have caused the problem. Take ownership but at the same time don’t be a doormat.
Roll Back The Changes
You did take a full recoverable back before you made the changes didn’t you :)? I’ve said it before but I’ll say it again you are only as good as your last backup. I hammer this into my team in our processes and procedures, the first thing we ever do is take a backup.
If possible we do our work on a cloned staging site so we can test in development before making things live.
Roll back to a point in time before the changes were made and test to see if the situation still exists. If it does not our changes were to NOT blame, if the issues goes away …
Fess Up If We Have caused An Problem
We never try to cover up an issues we have introduced, we “fess” up to the problem and plan a solution to fix the issue whilst also fixing the original tech support call.
Trying to cover our ass with excuses and double speak never works, we own our mistakes and fix them.
Find A Solution
Even if we did not cause the issue, the client still has a problem, our job is to find a solution not pass the buck.
We will trouble shoot the problem find what is causing the issue, if it is commercially viable we will fix it for free, then re-apply our new changes, if not we can give the client an idea of the cost to fix the problem.
Just to reiterate if we caused the problem we fix it free of charge.
Too often companies try to pass the buck if it’s not their issue (I’m looking at you hosting companies) our thinking is if we can help, our client, they will come back for more work in the future, if we try to pass the buck it leave a nasty taste in our client’s mouth.
Put Yourself in your Clients Shoes
If you are a the subject matter expert it’s all to easy to see that your work could not possibly have impacted another area, but your client needs your expertise to see this, all they see are your sticky finger prints all over their X and now something is not working.
How To Give Out You Touched It last Feedback.
If you are ever in the position to give feedback to an employee or supplier in a “you touched it last” scenario, can I make a suggestion?
To make the fix as painless as possible for everyone involved, don’t go on the attack with pointy e-fingers and acidic emails. Simply say we noticed an issues after the last update, can you roll it back to see if the changes have caused that problem.
It’s neutral non-accusational and it stops the fight or flight response in the recipient of the email and you will get better results.
Wrap Up
It’s not nice to have your professionalism questioned, but at the end of the day you are the expert and your client has a problem, step up and fix it, is my motto ( well that’s not 100% true it’s Carpe Pizza but that doesn’t end the blog post very well).
Google have announced that running your site over https will improve your search rankings, see this post for more details. In this post I will take you through making your WordPress site run over HTTPS.
I’ve decided to make wpdude.com run over https in its entirety, this post will show you how to do this.
What Is HTTPS
HTTPS is the secure form of https or hyper text transfer protocol, the way web pages are served from your webserver to your browser.
When you move to https everything is encrypted between your web server and your browser so no one can intercept and read what is happening on your web session.
Get An SSL Certificate
The first step in your quest to encrypt is to get an ssl certificate. An SSL certificate is added to your webserver and
This is what the interwebs has to say about SSL certificates:
SSL Certificates are small data files that digitally bind a cryptographic key to an organization’s details. When installed on a web server, it activates the padlock and the https protocol (over port 443) and allows secure connections from a web server to a browser.
Your hosting provider will add a certificate to your site, there will be a small cost involved, speak to your host about getting and installing
Force HTTPS
Once your certificate is installed it’s time to make your site run over https, the easiest way (as always) is to install a plugin to do this for you, my preferred one is:
Once that plugin is installed that’s it, there are no configuration options.
The beauty of this plugin is it forces all connections over HTTPS and tells the search engines that all links have changes and the index needs to be updated, for the techies that’s a 301 redirect.
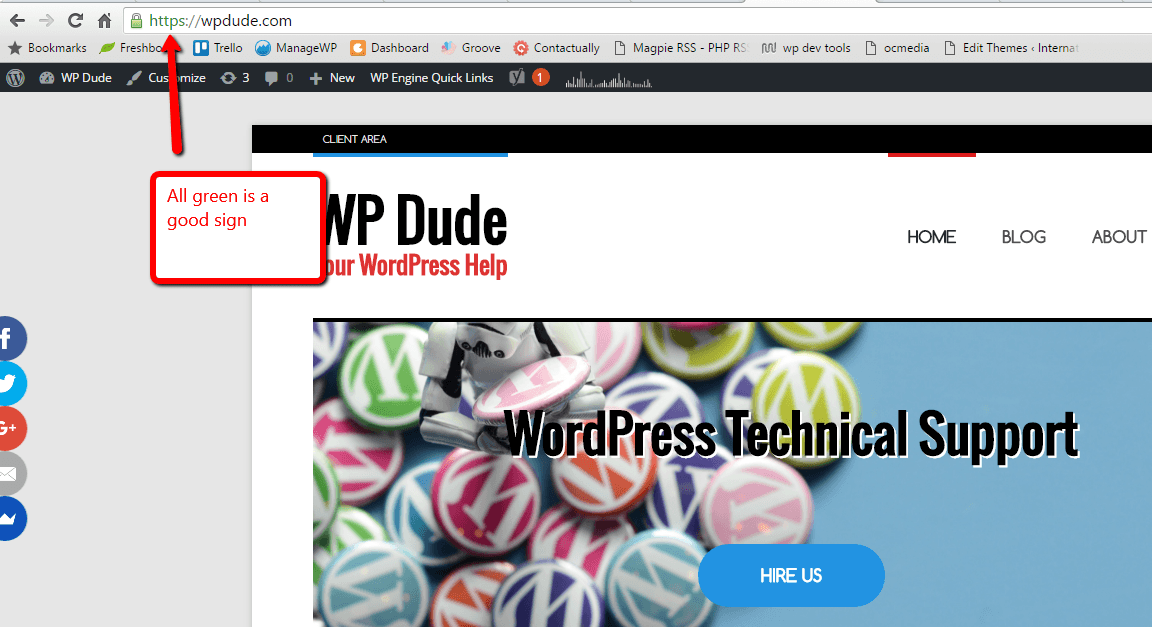
Testing It Has Worked
To test the SSL is working as expected, you need to access the from end of your site, if the browser redirects you to the https version things are working as expected.
Click for full size image
If you are seeing red errors on your link there are issues.
Fixing Mixed Content Issues
You have probably added a lot of links into your site over HTTP over the years, it’s a good idea to fix those links to stop your posts and pages serving up mixed content over http and https.
The best way to do this is with a search and replace on your database. I wrote a post on the plugin Better Search and Replace. I used this to search for and change links in my posts.
Other areas to investigate are custom menu links, my home link was pointing to http://neilm.wpengine.com/ and any widgets. Here is a video to show you how to spot mixed content.
Encryption Impacts Performance (a little)
Encrypting you pages add a little bit of performance overhead, but not a huge amount, I think it is worth taking this hit to improve security.
Wrap Up
Things went relatively smoothly for me, I’ve done this for clients and sometimes plugins are hard coded with URLs and I have had to do some coding for their site.
Adding a little more security will keep Google happy and help secure the interwebs.
I’ve brought a concept from big corporate IT over into my small business at WPDude.com and that is fix on fail.
I offer a fix on fail service to my maintenance plan clients in this post I want to explain what fix on fail is and how it applies to a WordPress site.
What Is Fix On Fail?
As I’ve already mentioned fix on fail is a concept I first learned during my corporate IT days, I used to work in massive corporate datacentres as a Microsoft Systems engineer, building massive networks of computers.
We would have plans to develop and build new installations but we also had to build in a lot of slack for the inevitable fix on fail, that is fix the stuff when it breaks.
This is the most stressful part of the work, when the brown stuff hits the oscillating, rotating desk top device that is where you earn your money.
Fix on fail is recovering a server / site / service when it crashes.
The Real Reason Our Maintenance Plan Exists
Backups and updates for your WordPress site are all very good, but the real reason the plan exists is to cover you in the eventuality that your site crashes and you don’t have the technical skills to get it back online.
That is when we fix the failure.
Activating Fix On Fail
Fingers crossed our monitoring of your site will tell us if the site has crashed, but sometimes fix on fail is require when the site is up but functionality is down, for example your site is up but the e-commerce plugin has crashed.
We give our clients access to an emergency email address which raises a call in our helpdesk where we take over and get the site back online.
Our Trouble Shooting Process
We have a trouble shooting process so we can step through an issue in a standard process. Fix on fail is stressful so we need a standard process to ensure we don’t break the site further and get you back online ASAP, while our inbox is in melt down from a stressed out client.
The process is
Take a backup as is so we can always roll back
Deactivate all plugins and themes
Activate debugging
Collect any errors or warnings
Slowly step through each layer to identify what caused the issue
Bring site back online by eliminating problematic component
Fix or replace problematic component
Fix Or Restore
The beauty of our maintenance plan is we have multiple restore points so we can always get your site back online, but I prefer a fix rather than restore.
An old mentor told me you are only as good as your last backup, I drill this into my team we check your backup and ensure we can recover your site.
Examples
Some examples of fix on fails we have done for our clients:
Plugin clashes – a clients portfolio images were not showing up, we found a plugin clash and fixed it
Memory issues – a site was throwing an error due to limited memory, we increased the memory level
Site hacked – we had a clients who’s site was hacked due to a back-door we detected it and removed malware
White Screen of death – we see this all the time new components, theme issues all cause the white screen of death, troubleshooting kicks in
.htaccess issues – plugins added rogue code into the .htaccess config file of a client we troubleshoot and fixed it
WordPress Updates – the latest WordPress update has caused massive issues with certain themes we recoded javascripts to fix problems
Rollbacks – a client made some changes that were not successful we rolled back our backup archive
Comment issues – too many spam comments filled the database
Wrap Up
If you need the security of a fix on fail solution for your WordPress site please consider taking out our maintenance plan.
I’ve been jumping between CRM (customer relationship management) solutions for some time. I’ve finally settled on one and I thought I would share the thinking behind why I have chosen Contactually.
I’ve been running wpdude for nearly eight years and in the time I have amassed nearly 7000 contacts, I need a database to manage those contacts. I want the ability to network with people and reach out to them on an ongoing basis to see if they need help with their WordPress site.
Having a database of contacts you can reach out to on a regular basis to generate work from is an incredibly valuable asset. It stops the feast and famine cycle common with project based work. It removes the need for paid advertising or working on job bidding sites (hint they are looking for the lowest price).
But What About A Mailing List?
I also have a mailing list of 1700+ contacts who have signed up to hear from me about new blog posts or get my lead magnets, but I have found that not everyone who wants to hire us also wants to take part in our content marketing.
If I limit myself to the 1700 people on my mailchimp list there are more than 5000 contacts I’m not reaching,.
Using a CRM allows me to personalise my reach-out, categorise contacts and generally have more control on how I network with a contact.
My Main Issue With CRM packages
My main issue with the CRM packages I have used (contractually included) are:
Lot of hard work at the start to setup a “clean” database of useful contacts.
No visibility of whom to contact.
Getting all my contacts into one place.
Keeping contacts updated (automated preferably).
Ensuring new contacts are added.
Why Contactually Won The CRM War!
In no particular order here are the features that made me select Contactually over the other CRMs out there
Bucketing Contacts
I can place my contacts into one or more bucket or categories to organise my interactions with people I have the following buckets:
WPDude – anyone who has interacted with WPDude
WPDude Clients – people I have worked with or who have requested a quote, people definitely interested in the services we offer
WP Dude maintenance clients – people with a recurring maintenance plan
Do not contact – people who have requested not to be contacted, or their email bounced
Bucket Game
One of the really difficult and time consuming aspects of setting up your CRM is cleaning your database (see below).
Contactually has a great feature called the bucket game where a contact is flashed up with details of your last few interactions and with the click of a button you can assign that person to a bucket.
You are given a hit of 50 contacts to quickly work though and it takes about 5 minutes to allocate them to buckets, a great way to clean up your list when you start work on your CRM.
Integration With Gmail
One of the best features in my opinion. Contractually integrated with my Gmail account and automatically creates a history of my email interactions
When I look at a contact I can see the emails they have sent me and I have sent to them via my Gmail account.
Not having to manually build up that history has saved me countless hours.
Automated List Of Contacts to Erm Contact
In Contactually I can say that I want to contact people in a particular bucket every X days, and I want to contact Y people per day.
Contactually does this for me, I have said I want to reach out to existing clients every 90 days and I want to do that to 10 customers per day. Contractually organises that list, and I work through them as part of my daily routine. I send an email checking in seeing if they need help from us. This is all done inside Contractually some CRMs make you jump over to your email client which is a real pain.
Here is the screen of contacts I’m presented each day.
List of contacts to reach out to daily
Scalemail
You can also send out email blasts with my chosen CRM.
If you want to reach lots of people quickly you can with scalemail. I have been using that as part of my database cleaning routine to quickly contact old contacts to see if they still need WordPress help.
Integrations
I’m a big fan of automating as much work as possible, I’m using the following integrations:
Mailchimp – people are automatically added to my CRM if they opt in to
Zapier – anyone requesting a quote is added to my database via Zapier
Freshbooks – I downloaded my Freshbooks database manually and uploaded it as a CSV to Contactually
Gmail – see above
Cleaning Your Database
I cannot overstate the importance of cleaning your database, it’s hard tedious work but once you have removed the people not interested in your product or service, you are left with a gold mine of contacts. When I reach out I get several leads per day.
When I first started using Contacually it was presenting me contacts that were very old that had not been reached out to or some time. As a result I was getting lots of old bouncing emails, people not interested in WordPress any more.
I’ve spent about 8 weeks cleaning 50 contacts per day. I remove bounced emails and people asking to unsubscribe or let me know they don’t use WordPress any more.
Be prepared for the Asshats you had forgotten about. They are still in your un-cleaned database waiting to catch you out. I’ve reached out to people who I had forgotten about, but have had poor interactions with in the past. Some people bare grudges and will let you know, how dare I send an email to someone who I did not want to quote on their job four years ago 🙂
Downsides
Contractually has it’s downsides too.
It’s expensive compared to other CRM solutions, I’m paying $35 per month for their basic package
There is no opt out of a CRM like there is for email, so I’m doing a lot of manual work removing people from my list.
Other Features I Don’t Use Any More
There are a couple of features that I don’t use any more:
Programs – automate your marketing with a program, I found automatic outreach was sending generic emails to people, but could be useful
Pipelines – if you have a long sales cycle you can move your prospects through a process of qualification, sales meetings etc, this was more effort than it was worth in my business.
Wrap Up
CRMing is gruelling at first you need to spend that time cleaning your db to get rid of the dead contacts, people who don’t want you but once you do Contactually or any other CRM for that matter gives you a gold mine of contacts to prospect . When you pan your contacts projects seem to appear ( can I get any more gold mining references into one paragraph, oh yes I can ) and that is a useful nugget of information.
Contactually has a free trial give it a go, but bare in mind cleaning your DB will probably take longer than your trial period 🙂
Additional reading I first found about about Contactually with the excellent read Book Yourself Solid, this is well worth a read for any service providers out there.
This is a guest post by Anastasia Pirog from TemplateMonster. TemplateMonster is a premium theme / template marketplace where you can buy an new look and feel for your website, take it away Anastasia where shel tells us How to choose the best template for your website – Neil
How to choose the best template for your website and not to be overwhelmed.
Building a website is quite a hard task. And even if you decided to choose a ready solution and pick up a nice template it can be not as easy as you might think. A huge variety of marketplaces and the themes they offer can be quite overwhelming for the newcomers as well as for the professional developers. So what should you do to pick a worthy template? Here you can find a little tutorial on how to find the winning template. So let’s have a look:
Step 1 – The CMS
So the first thing you face when visiting the template marketplace is the variety of themes and platforms they are based on. The basic thing you have to decide on while building a website is what CMS you need. If you are if you’re an experienced developer or just know what you already need, you can miss this step. I won’t write a lot here. The thing you need to understand is that everything depends on your requirements. There’s no right or best CMS, each has its own advantages. I’ll just say that if you are a beginner, and that’s why you are probably reading this paragraph, or you just want a convenient and easy in use website that will let you set your resource on your own – WordPress is for you. It’s convenient and with it, you can build a website that will suit different requirements from personal to huge corporate resources.
Step 2 – Free or Premium
The other crucial question that bothers the minds of lots of people is whether they should choose a free or premium template for their resource. Today, there are a lot of marketplaces that sell premium themes like TemplateMonster or share the freebies like WordPress.org. The advice that I’m giving is straightforward. Once again I’ll say that everything depends on what you need. If it’s your first website or you just want to create a website where you will share the stuff you like with your friends or like-minded people, than a free template will be just the thing to feel the water of website building. Though if you want to create something professional and serious or to have earnings from it, you should invest money in your website, so a premium template is just the thing. The premium themes often have better design and quality. I’m not telling that free themes are worse. But chances that you’ll spend more effort and energy while searching for a great free template are higher compared to searching for the paid resource. Here’s when the rule of “no money, no honey” works.
Step 3 – Working with the marketplace
So you know what CMS you need, decided on your budget and design. You go to the marketplace, you see all those templates. And you get confused. Seems familiar? I think so! It’s a situation almost everyone faces.
So what should you do? Just think of the website you want and choose something.
Use the search for your template
Each of the marketplaces has a convenient form of the search. If you know exactly what you want from your website, just type the name of the needed feature or product type in the search form or find the categories menu and choose the one that suits your needs. If not, just start with such things as the kind of your website.
Stick to your sphere
Today web designers and developers create templates for certain spheres. What is good about each template, is that by adding your content and changing the images you can create something completely different. What is good about the thematical template, is that someone has already thought about how the website should look like. The visual language and structure of a corporate website are different from the personal website, one needs more texts, the other one – more images. So if someone has already created a layout that you need – why not to get a profit out of it? It’s when you have to go back to the previous statement. Use the search.
Think of the needs of your stuff and your clients.
While building a website and choosing a template think what are the best things for presenting your content. And what is more important, think about your clients. If you are in their place and visit a website like yours, what do you want to see there? If it’s a news website – choose a template with convenient archive structure and search, for an online store – choose a template with convenient navigation, notable call-to-action buttons, image content for presenting your products in the best way, this list can be continued.
The design
The design of templates is versatile. And of course, each man to his taste. But you surely need to consider certain things. Of course, choose the template that you like most of all. The great thing about the template is that a lot of marketplaces let you use stock photos in the package. So if you don’t have to impress your website users with your own images, you can easily leave the template the way you choose it. From the things you should pay attention to, the next are the ways to customize the design. Look how the structure can change, what you can do with the footer and header, how you can change your content, how the size of images can change, if there are any fonts and variants of texts. Pay a lot of attention to the color schemes. It’s great if the template has a color switcher, and you can easily change your website. If not, look at the color the designer used for the template. Here everything depends on your needs, choose subtle colors for official websites, and more vivid colors for websites that will serve for another purpose.
Usability
This is one of the needed technical characteristics you have to bear in mind while choosing your website design. The template should be easy for you to set it, so that later your website would be convenient for your clients to navigate through. That’s why look at the customizer first. And make sure that you understand how to use and set your template. Look through all the pages of the template, and choose the one which doesn’t require you to think long where to click to get there or how you can find that information.
Look at the features that are listed in the template. And choose the template that will suit your needs. Look at the framework that developer used for the template, and consider what you need. If you want to focus on the presentation of the media content, look at the features like video or audio integration, if you want to build an international website, look at the translation feature.
The features that will suit any website are: responsive design and cross-browser compatibility. These features will ensure that your website will scale to fit any screen of any device and work in all of the browsers. The useful thing is that marketplaces allow searching a template by the links to one or several specific features, so if you think that your website will need a certain option, just click on it, and you will get the list of template from which you can choose.
Some marketplaces offer you a trial period. Look, if your template provides this kind of service. Does it have such a period? Give it a try, then!
Listen what people say
The marketplaces have useful things such as clients’ testimonials and ratings. If you still don’t know where to start, try to look at the bestsellers or templates with the highest ratings. If you choose several templates or know what you want, look at the testimonials or reviews of the people who have used these items already. There you can find some useful information about how this template really works, if there are any bugs or if it’s worth buying at all.
Step 4 – Enjoy your website!
It not so easy to choose a template, but you can do it. Decide on what you want from your website. Don’t be confused by the variety of themes, look for certain things, choose the template that will suit all your needs, customize it with ease, and get your astonishing website going. Enjoy! It’s very easy to get overwhelmed with a wide range of themes in the marketplaces. Each day there are new items appearing. Things you are looking for have to be are the best design and features for your website. The thing that wasn’t said here is the price. I won’t tell you about the price. This is what you should decide for yourself. Obviously, if you have a big budget, it’s better to spend some money on your website. The key rule is to know what you want for your online resource. You should keep calm, and choose the template that will suit all your needs. And all will work!
The standard emails WordPress sends out are just okay. Nothing more nothing less, in this post I want to show you how to customize your WordPress emails and jazz them up a little.
Every interaction with your site visitors is a marketing opportunity and a way to promote your brand chance to promote your brand.
They are a little bit lacklustre and don’t promote your brand very well.
What Emails Are Sent?
WordPress sends out a number of emails, here are some examples
New user registrations (to the admin and to the new user)
New comments
Password reset
Admin emails (new comments, new users but why you would need to edit these are beyond me).
Why Customise Emails
The emails WordPress sends out are not that great, they are plain text, have standard responses.
The emails use your standard WordPress admin email and name, sometimes you want to change those.
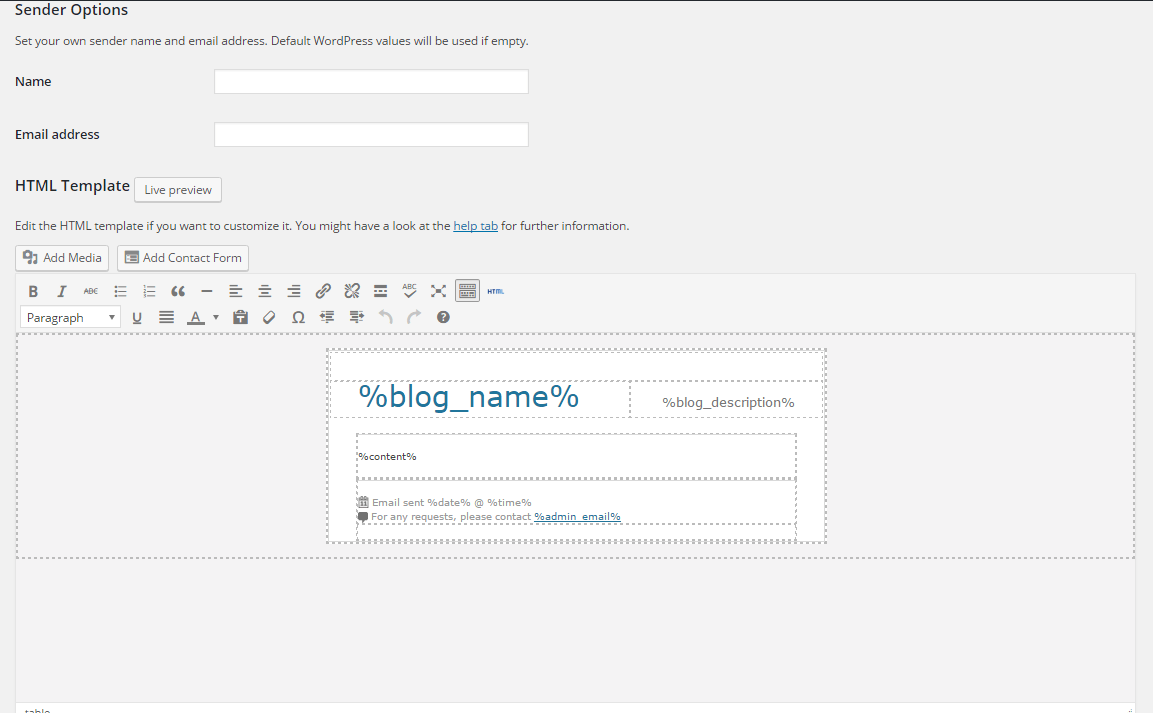
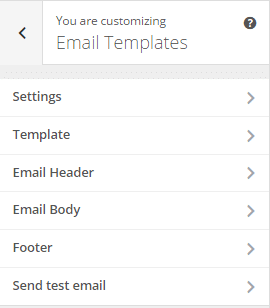
You might want to add a logo, call to action or just bring the WordPress emails in line with other emails you send out, you need to customise your WordPress emails to do this.
There’s A Plugin for that
As always if there is a problem to be solved in WordPress, there is a plugin for or, or quite a few, here are my two favourite plugin to customise the emails
WP Better email creates a template to wrap around the default email content. You cannot change the content of the emails but you can wrap a good looking template around it. WP Better Emails also allows you to change the name and from email of the email sender.
One of the really useful features of gravity forms is the ability to create content in WordPress from a form on the front end of your site.
I’ve created a video tutorial to show you how to create a form that will collect data and create a blog post.
Why Would You Want To Create Content With A Form
The simple answer is user generated content. This allows you to collect data from site visitors without giving them login access to your website.
Examples
Here are some examples of collecting user generated content:
News site – one of my clients runs a local news site for a small town. She has a form on her site which allows local residents to submit stories, they are saved as draft, to run through an editorial process.
Mountain Climbing site – this client allows climbers to submit routes, they are assigned to categories such as state, difficulty. He allows images to be uploaded, this content is then submitted to a database of climbs throughout the US.
Testimonials – I use this technique on wpdude.com to collect client testimonials. The client submits a form with hopefully glowing praise at wpdude.com/add-testimonial it is added to the testimonial custom posts types as a draft, I then review and publish the testimonial.
Video
Wrap Up – Creating Blog Posts Using Gravity Forms
If you ever need users generated content and don’t want to give site visitors a login consider using gravity forms.


![[WEBINAR] WP Insure Our WordPress Maintenance Plan](https://dev.neilmatthews.com/wp-content/uploads/2016/04/19397662482_1a1a2c8d18_b.jpg)